


Master Bedroom Reveal + DIY Herringbone Wall with Stikwood


This is the wall across from the DIY herringbone wall. I'm obsessed with this CB2 media console. I was eyeing it for so long before I finally pulled the trigger, and I'm so glad I did. We plan to put a TV above it, but we just haven't gotten around to it yet. I know they say you aren't supposed to have a TV in your bedroom, but it will just be so cozy to get in here and watch a movie ... especially since I am currently in newbornland nursing all day everyday. I am also obsessed with this Threshold lamp for console table styling. It's new at Target. I would rush over there because you know the good stuff always goes so quick there, and you can never get it again.

Here is our cozy lil master bedroom reading corner. That DIY tripod lamp is super easy to do. I shared this tutorial not too long ago.

This crossover basket might be one of the best purchases I've ever made. The size is just amazing. You can fit all of your throw pillows in there when you take them off to go to sleep at night. We are going to buy another to keep in the living room for some of our kid gear. As far as how to style a picture ledge, a good rule of thumb is to keep your frames in the same family but alternate the sizes and shapes.

You might remember this DIY marble side table. There is one step to make this sucker. That's my kind of DIY. As far as how to style a bedside table ... here are a couple of tips I've learned. Start with lighting. Hang a piece of artwork or photo above the bedside table or lean it against the wall. Add a horizontal object to ground your accessories (i.e., a rectangular box, stack of books, or a tray). Add in flowers or a plant. In this case I didn't because I have a plant right next to the nightstand. Add an object with an interesting lines. Here I used this wooden bird. And generally, you want to have an odd number of accessories. I broke the rule here; although I plan to add a small ring holder.

I just recently shared these oversized color blocked IKEA hack curtains on the blog. I love the way they turned out. If you have a large window that you are having trouble finding curtains for, these are easy DIY no sew curtains.

The sweater knit throw draped over the bed is so soft, and the size is incredible. It hangs over the entire king bed which is hard to find. It is totally my pick for bedroom interiors. And this rattan tray is just so good. It's perfect for breakfast in bed. It would be so great to set one up with drinks in your guest room before an arrival of your friends. The bed frame is a DIY I'll be sharing soon too!

This is a DIY wall lamp I'll be sharing soon. Stay tuned.

If you are looking for bedroom plant ideas, the fiddle leaf is a great option. It gets really big (tree like), and its graphic leaves make a statement. The green contrasts the black DIY herringbone wall nicely. I am totally enamored with this mid-century turned wood leg planter from West Elm.

Love this ladder and throw blanket combo. It was the perfect height for underneath the picture ledges.

This rattan tray is the perfect tool for breakfast in bed or for greeting you guests with some goodies.

This woven throw pillow is from Target. It's neutral and fun all at the same time.

One of my favorite bedroom styling ideas is to place a bench at the end of your bed. It just looks so chic, and it's functional too. It's a great spot on which to grab a seat or throw clothes.

This box above is a DIY decorative box I made. I couldn't find a box big enough to hold everything we wanted bedside (remotes, eye masks, etc) so I made one using a couple of hinges and two bath trays. This makes my DIY top ten list.

The key to picture ledge styling is to either choose the same frames or frames that have a common element. You can't go wrong with black and white right? The black and white frames are IKEA. These metal gunmetal shelves are CB2. I cannot get enough of CB2 these days. Their merchandise is on point, and their pricepoints are on point. That was a lot of "points" ... sorry.

The planter is CB2 as well. No surprise there.

I was looking for above bed ideas for months, and I finally found this mid-century metal wall décor. The only problem was it was too small. So I put two together to make one big piece. Because of the nature of it, you can't even tell when you put two together. I wished I would have spaced these just a tad bit closer. So if you are doing the same thing, put the pieces even closer than you think. Alright, on to what you are really here for ... the tutorial of the DIY herringbone wall!

SUPPLIES
4' charcoal Stikwood planks
Stikwood J roller
miter saw
pencil
measuring tape
INSTRUCTIONS
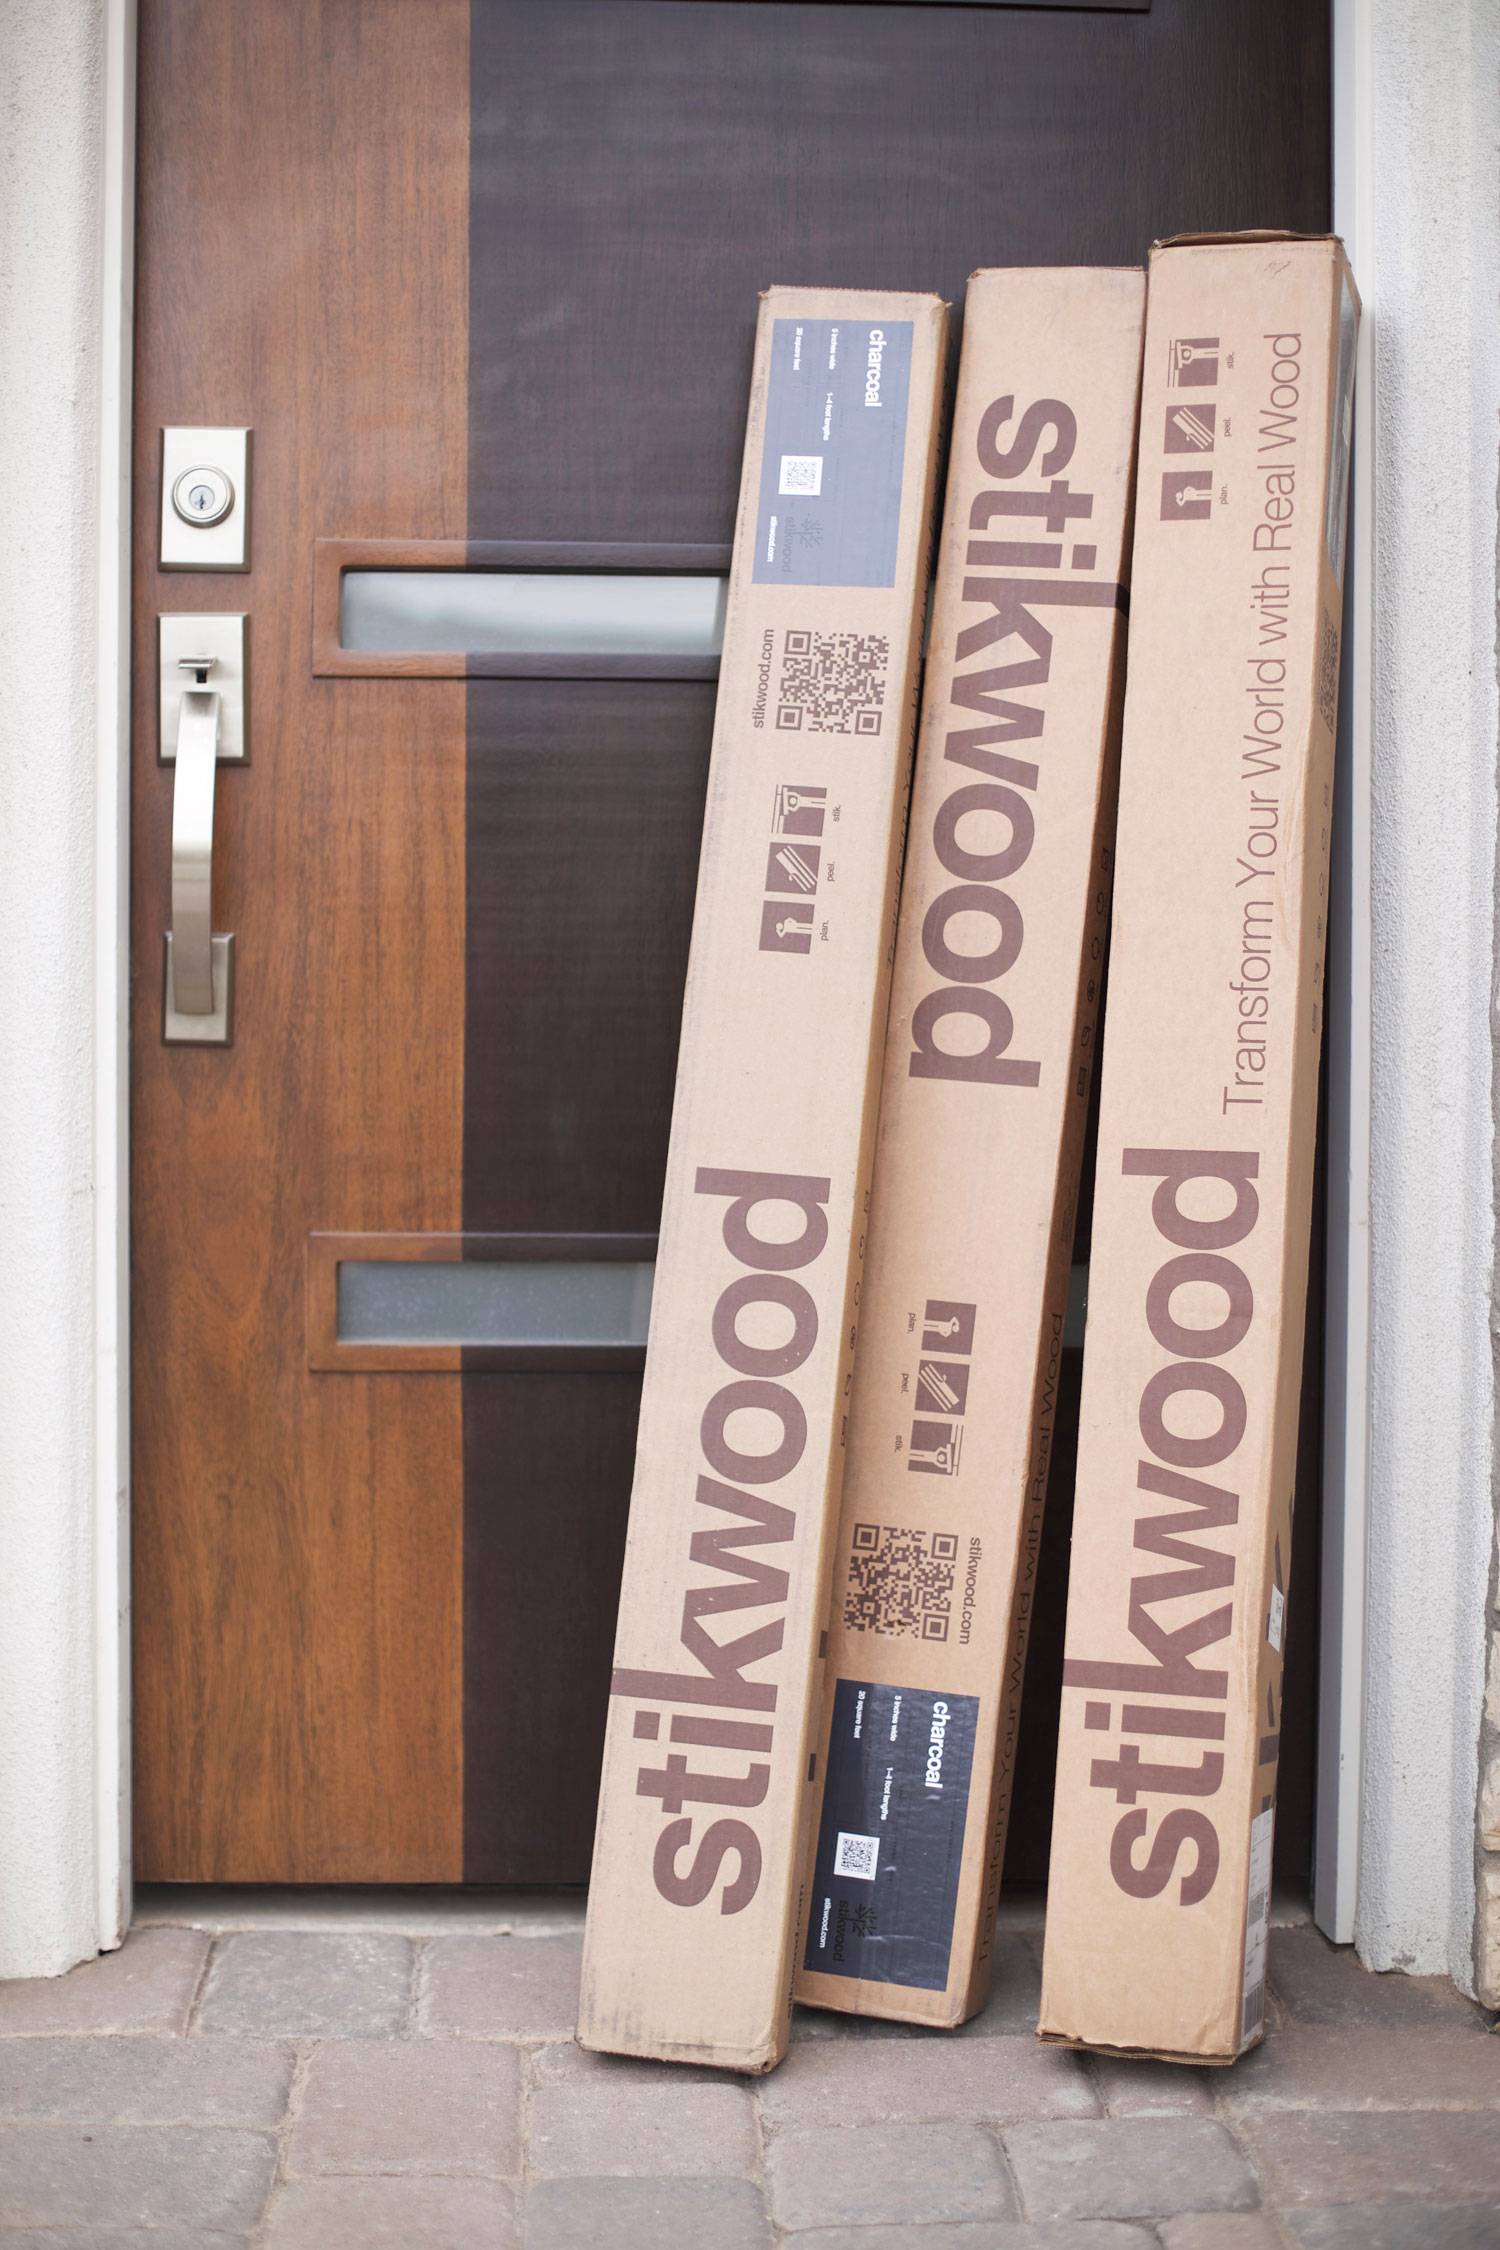
Start your DIY herringbone wall by measuring the height and width of the wall. Multiply these numbers together to find the square footage of the wall. For a herringbone pattern, you will need to order about 15% extra Stikwood to cover the wall. And then if you are doing a border around the wall like I did, make sure to order enough for the border as well. Stikwood will ship the wood right to your door. It's awesome.

Find the center point of the wall. Draw a line vertically up the center of the wall.

Place the first piece of wood so the top right point is lined up with the center of the wall, and the bottom right point is touching the baseboard.

Here is our lil helper, Flynn, showing you the sticky on the back of the wood. Peel the strips from the back and stick to the wall.

Secure using the roller.

Alternating sides, continue up the center of the wall until you reach the ceiling.

For the sides of the wall, line up the boards like the above photo. Note the side of the plank is lined up with the side of the adjacent plank, and the bottom right corner of the plank is touching the wall.

Draw a line from the above point ...

down to this point. This is where you will do the cut using the miter saw. After you do the cut, rotate the board around and line up the cut with the wall.

For the corner pieces, remember the cuts will either be a 45 degree angle or a 90 degree angle. I found the easiest way to find the cuts for the corner pieces was to measure how long each plank side would need to be and mark that. Then draw a line from mark to mark.
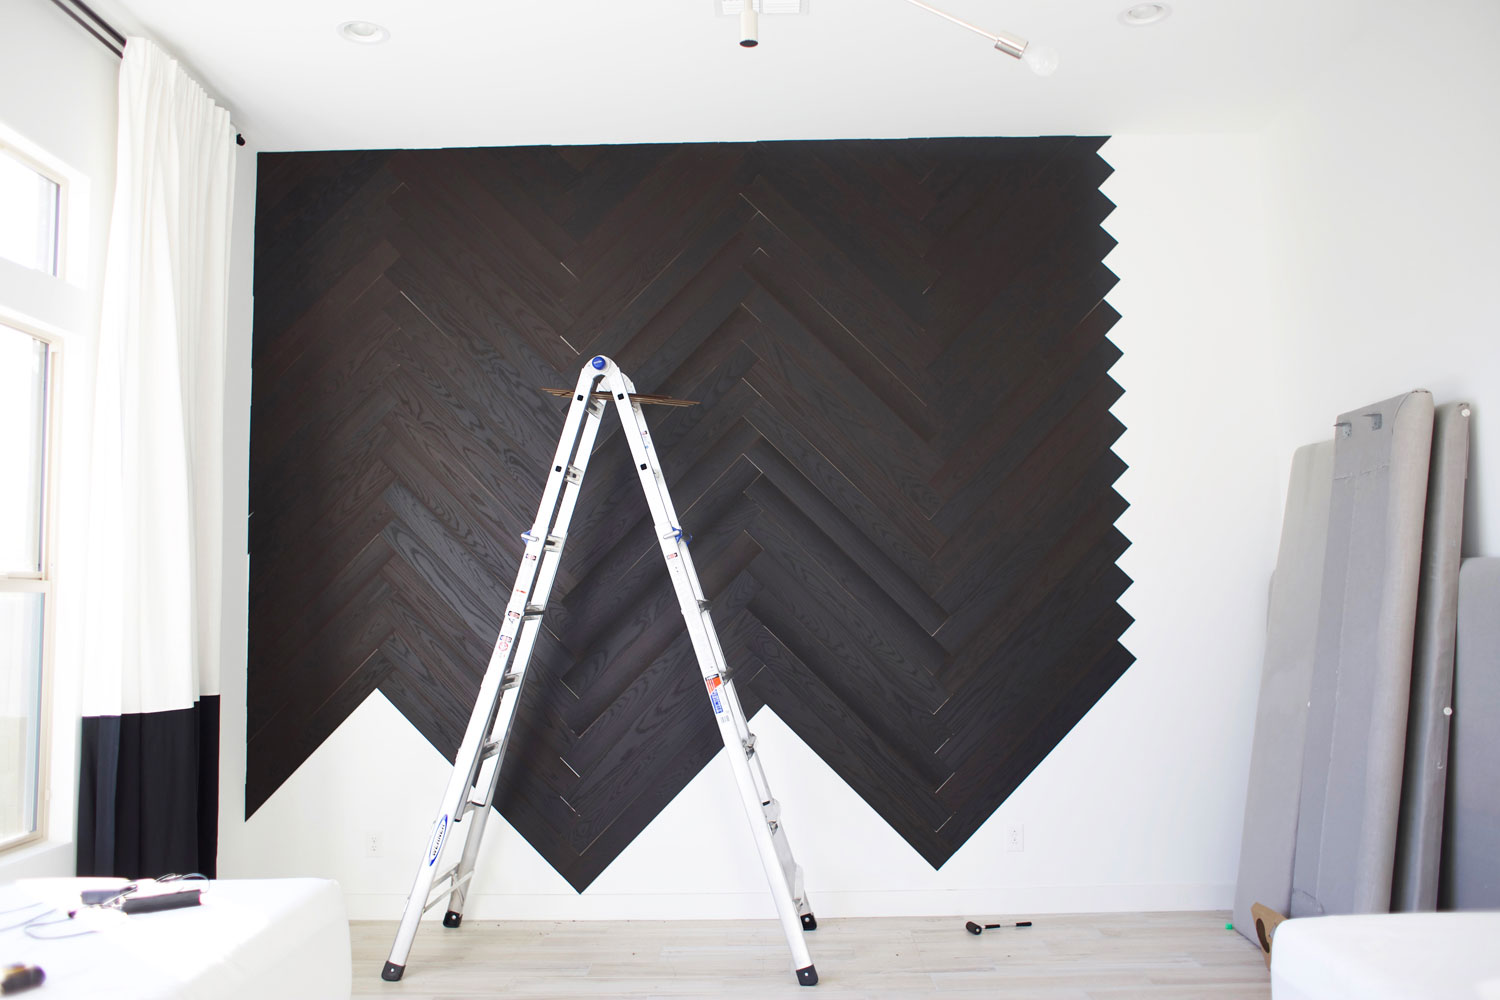
For the top pieces, you will follow the system described above for the side planks. However, the line you will draw now will not be vertical, it will be horizontal.
VIDEO TUTORIAL

If videos are more your thing, hit play above. I walk you through it step-by-step. If you like the video, please subscribe to me on YouTube!

It is totally optional, but I did a border around the entire wall. Something else that is optional is to fill in any cracks with a sharpie.

And here is our lil avid reader, Flynn man.

I think this might be my favorite pic of the bunch. This lamp from Target is such a statement piece. And this media console sits on the opposite side of our bed, so I get to look at this pretty thing the minute I wake up.

What are your thoughts?! I'd love to hear in the comments below. Plus a major shout out to my dad. He helped this really pregnant lady with this project. Without being able to get on a ladder, there was no way I was going to get this done on my own. He was a lifesaver.

If you find this post helpful, I would love it if you subscribe below! Subscribers get exclusive DIYs and a free party printable collection just for signing up!
SHOP THIS POST


